What is in this article ?
In this artivle, we’ll try to build a bookstore REST API that provides book data and performs CRUD operations.
Let’s start by initializing a new Go module. This will enable us to manage the dependencies that are specifically installed for this project.
<pre>
Note: you can use the command go env to know where your GOPATH locate
or set in with this command
echo “export GOPATH=/root/go” >> ~/.bash_profile
</pre>
go mod init api
Now let’s install some dependencies : gonic and gorm
go get github.com/gin-gonic/gin github.com/jinzhu/gorm
After the installation is complete, your folder should contain two files: go.mod and go.sum.
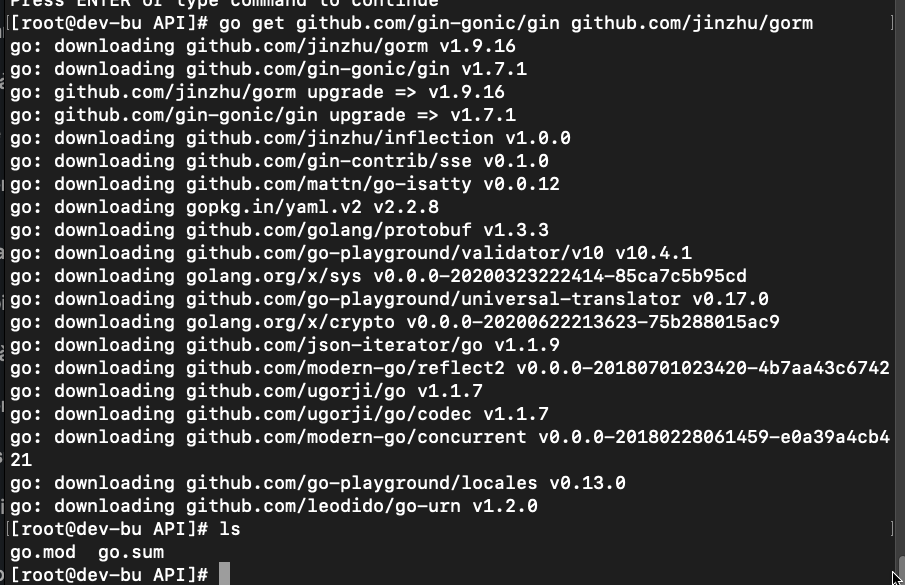
Both of these files contain information about the packages you installed, which is helpful when working with other developers.
If somebody wants to contribute to the project, all they need to do is run the go mod download command on their terminal to install all the required dependencies on their machine.
Setting up the server
Let’s start by creating a Hello World server inside the main.go file.
package main

import (
  "net/http"
  "github.com/gin-gonic/gin"
)

func main() {
  r := gin.Default()

  r.GET("/", func(c *gin.Context) {
    c.JSON(http.StatusOK, gin.H{"data": "hello world"})
  })

  r.Run()
}
To test it out, we’ll start our server by running the command below.
$ go run main.go
Then run this command on another command windows
curl localhost:8080
Result
{"data":"hello world"}
Setting up the database
The next thing we need to do is to build our database models.
Model is a class (or structs in Go) that allows us to communicate with a specific table in our database. In Gorm, we can create our models by defining a Go struct. This model will contain the properties that represent fields in our database table. Since we’re trying to build a bookstore API, let’s create a Book model.
// models/book.go

package models

import (
  "github.com/jinzhu/gorm"
)

type Book struct {
  ID     uint   `json:"id" gorm:"primary_key"`
  Title  string `json:"title"`
  Author string `json:"author"`
}
Our Book model is pretty straightforward. Each book should have a title and the author name that has a string data type, as well as an ID, which is a unique number to differentiate each book in our database.
We also specify the tags on each field using backtick annotation. This allows us to map each field into a different name when we send them as a response since JSON and Go have different naming conventions.
To organize our code a little bit, we can put this code inside a separate module called models.
Next, we need to create a utility function called ConnectDatabase that allows us to create a connection to the database and migrate our model’s schema. We can put this inside the setup.go file in our models module.
// models/setup.go

package models

import (
  "github.com/jinzhu/gorm"
  _ "github.com/jinzhu/gorm/dialects/sqlite"
)

var DB *gorm.DB

func ConnectDataBase() {
  database, err := gorm.Open("sqlite3", "test.db")

  if err != nil {
    panic("Failed to connect to database!")
  }

  database.AutoMigrate(&Book{})

  DB = database
}
Inside this function, we create a new connection with the gorm.Open method. Here, we specify which kind of database we plan to use and how to access it. Currently, Gorm only supports four types of SQL databases. For learning purposes, we’ll use SQLite and store our data inside the test.db file. To connect our server to the database, we need to import the database’s driver, which is located inside the github.com/jinzhu/gorm/dialects module.
We also need to check whether the connection is created successfully. If it doesn’t, it will print out the error to the console and terminate the server.
Next, we migrate the database schema using AutoMigrate. Make sure to call this method on each model you have created.
Lastly, we populate the the DB variable with our database instance. We will use this variable in our controller to get access to our database.
In main.go, we need to call the following function before we run our app.
package main

import (
  "net/http"
  "github.com/gin-gonic/gin"

  "github.com/rahmanfadhil/gin-bookstore/models" // new
)

func main() {
  r := gin.Default()

  models.ConnectDatabase() // new

  r.Run()
}
RESTful Routes
We’re almost there!
The last thing we need to do is to implement our controllers. In the previous section, we learned how to create a route handler (i.e., controller) inside our main.go file. However, this approach makes our code much harder to maintain. Instead of doing that, we can put our controllers inside a separate module called controllers.
First, let’s implement the FindBooks controller.
// controllers/books.go

package controllers

import (
  "github.com/gin-gonic/gin"
  "github.com/rahmanfadhil/gin-bookstore/models"
)

// GET /books
// Get all books
func FindBooks(c *gin.Context) {
  var books []models.Book
  models.DB.Find(&books)

  c.JSON(http.StatusOK, gin.H{"data": books})
}
Here, we have a FindBooks function that will return all books from our database. To get access to our model and DB instance, we need to import our modelsmodule at the top.
Next, we can register our function as a route handler in main.go.
package main

import (
  "net/http"
  "github.com/gin-gonic/gin"

  "github.com/rahmanfadhil/gin-bookstore/models"
  "github.com/rahmanfadhil/gin-bookstore/controllers" // new
)

func main() {
  r := gin.Default()

  models.ConnectDatabase()

  r.GET("/books", controllers.FindBooks) // new

  r.Run()
}
Pretty simple, right?
Make sure to add this line after the ConnectDatabase. Otherwise, your controller won’t be able to access the database.
Now, let’s run our server and hit the /books endpoint.
{
  "data": []
}
If you see an empty array as the result, it means your applications are working. We get this because we haven’t created a book yet. To do so, let’s create a create book controller.
To create a book, we need to have a schema that can validate the user’s input to prevent us from getting invalid data.
type CreateBookInput struct {
  Title  string `json:"title" binding:"required"`
  Author string `json:"author" binding:"required"`
}
The schema is very similar to our model. We don’t need the ID property since it will be generated automatically by the database.
Now we can use that schema in our controller.
// POST /books
// Create new book
func CreateBook(c *gin.Context) {
  // Validate input
  var input CreateBookInput
  if err := c.ShouldBindJSON(&input); err != nil {
    c.JSON(http.StatusBadRequest, gin.H{"error": err.Error()})
    return
  }

  // Create book
  book := models.Book{Title: input.Title, Author: input.Author}
  models.DB.Create(&book)

  c.JSON(http.StatusOK, gin.H{"data": book})
}
We first validate the request body by using the ShouldBindJSON method and pass the schema. If the data is invalid, it will return a 400 error to the client and tell them which fields are invalid. Otherwise, it will create a new book, save it to the database, and return the book.
Now, we can add the CreateBook controller in main.go.
func main() {
  // ...

  r.GET("/books", controllers.FindBooks)
  r.POST("/books", controllers.CreateBook) // new
}
So, if we try to send a POST request to /books endpoint with this request body:
{
  "title": "Hello world title",
  "author": "Viet Huy"
}
The response should looks like this:
{
  "data": {
    "id": 1,
    "title": "Hello world title",
    "author": "Viet Huy"
  }
}
We’ve successfully created our first book. Let’s add controller that can fetch a single book.
// GET /books/:id
// Find a book
func FindBook(c *gin.Context) {  // Get model if exist
  var book models.Book

  if err := models.DB.Where("id = ?", c.Param("id")).First(&book).Error; err != nil {
    c.JSON(http.StatusBadRequest, gin.H{"error": "Record not found!"})
    return
  }

  c.JSON(http.StatusOK, gin.H{"data": book})
}
Our FindBook controller is pretty similar to the FindBooks controller. However, we only get the first book that matches the ID that we got from the request parameter. We also need to check whether the book exists by simply wrapping it inside an if statement.
Next, register it into your main.go.
func main() {
  // ...

  r.GET("/books", controllers.FindBooks)
  r.POST("/books", controllers.CreateBook)
  r.GET("/books/:id", controllers.FindBook) // new
}
To get the id parameter, we need to specify it from the route path, as shown above.
Let’s run the server and fetch /books/1 to get the book we just created.
{
  "data": {
    "id": 1,
    "title": "Hello world title",
    "author": "Viet Huy"
  }
}
So far, so good. Now let’s add the UpdateBook controller to update an existing book. But before we do that, we need to define the schema for validating the user input first.
struct UpdateBookInput {
  Title  string `json:"title"`
  Author string `json:"author"`
}
The UpdateBookInput schema is pretty much the same as our CreateBookInput, except that we don’t need to make those fields required since the user doesn’t have to fill all the properties of the book.
To add the controller:
// PATCH /books/:id
// Update a book
func UpdateBook(c *gin.Context) {
  // Get model if exist
  var book models.Book
  if err := models.DB.Where("id = ?", c.Param("id")).First(&book).Error; err != nil {
    c.JSON(http.StatusBadRequest, gin.H{"error": "Record not found!"})
    return
  }

  // Validate input
  var input UpdateBookInput
  if err := c.ShouldBindJSON(&input); err != nil {
    c.JSON(http.StatusBadRequest, gin.H{"error": err.Error()})
    return
  }

  models.DB.Model(&book).Updates(input)

  c.JSON(http.StatusOK, gin.H{"data": book})
}
First, we can copy the code from the FindBook controller to grab a single book and make sure it exists. After we find the book, we need to validate the user input with the UpdateBookInput schema. Finally, we update the book model using the Updates method and return the updated book data to the client.
Register it into your main.go.
func main() {
  // ...

  r.GET("/books", controllers.FindBooks)
  r.POST("/books", controllers.CreateBook)
  r.GET("/books/:id", controllers.FindBook)
  r.PATCH("/books/:id", controllers.UpdateBook) // new
}
Let’s test it out! Fire a PATCH request to the /books/:id endpoint to update the book title.
{
  "title": "The Infinite Game"
}
The result should be as follows.
{
  "data": {
    "id": 1,
    "title": "The Infinite Game",
    "author": "Viet Huy"
  }
}
The last step is to implement to delete book feature.
// DELETE /books/:id
// Delete a book
func DeleteBook(c *gin.Context) {
  // Get model if exist
  var book models.Book
  if err := models.DB.Where("id = ?", c.Param("id")).First(&book).Error; err != nil {
    c.JSON(http.StatusBadRequest, gin.H{"error": "Record not found!"})
    return
  }

  models.DB.Delete(&book)

  c.JSON(http.StatusOK, gin.H{"data": true})
}
Just like the update controller, we get the book model from the request parameters if it exists and delete it with the Delete method from our database instance, which we get from our middleware. Then, return true as the result since there is no reason to return a deleted book data back to the client.
func main() {
  // ...

  r.GET("/books", controllers.FindBooks)
  r.POST("/books", controllers.CreateBook)
  r.GET("/books/:id", controllers.FindBook)
  r.PATCH("/books/:id", controllers.UpdateBook)
  r.DELETE("/books/:id")
}
Let’s test it out by sending a DELETE request to the /books/1 endpoint.
{
  "data": true
}
If we fetch all books in /books, we’ll see an empty array again.
{
  "data": []
}
Reference
https://www.digitalocean.com/community/tutorials/how-to-install-the-apache-web-server-on-ubuntu-18-04
https://github.com/rahmanfadhil/gin-bookstore
https://github.com/jinzhu/gorm
Bài viết khác

Use AWS to deploy your applications and services
Amazon Web Services (AWS) is a cloud computing platform that provides a wide range of services to help businesses and individuals build and deploy applications in the cloud. AWS offers a variety of services such as compute, storage, databases, networking, security, and more. In this guide, we will walk through the steps to get started […]

Use docker to run go project
Docker is a powerful tool that enables developers to create, deploy and run applications in a containerized environment. Using Docker to run Go projects has many advantages, including the ability to isolate your application from the underlying operating system, simplifying the deployment process, and allowing for greater scalability and flexibility. In this guide, we will […]
Install WSL for windows 10
1/ Enable feature Windows Subsystem for Linux Head to Control Panel > Programs > Turn Windows Features On Or Off. Enable the “Windows Subsystem for Linux” option in the list, and then click the “OK” button. Restart computer Now you can type on console: wsl –help 2/ Download ubuntu 18 from Microsoft Store or open […]
Make a binary file or script file run on startup on ubuntu
To make a binary file run on boot, you can create a startup script that will run the binary file when the operating system starts. The exact process for creating a startup script depends on the operating system you’re using. Here’s an example for a Linux operating system using the systemd init system: Create a […]

Explicit ssl bumping with Squid
To perform explicit SSL bumping with Squid, you need to perform the following steps: Generate a SSL certificate and key: You can either generate a self-signed certificate or obtain one from a certificate authority. The certificate and key will be used by Squid to encrypt and decrypt the traffic. Install and configure Squid: Squid is […]

Explicit ssl bumping with HAProxy
Basic guide About Explicit SSL bumping Explicit SSL bumping also known as “SSL interception,” is a feature of some reverse proxies and security appliances that allows the proxy to decrypt, inspect, and re-encrypt SSL/TLS encrypted traffic. The proxy acts as a man-in-the-middle, decrypting incoming SSL/TLS traffic and re-encrypting it before forwarding it to the destination […]

 Khoá học lập trình game con rắn cho trẻ em